Configuring Your POP or IMAP Email account in Microsoft Windows Live Mail
This tutorial shows you how to set up Microsoft Windows 7 Live Mail e-mail account. This tutorial focuses on setting up Windows Mail, but these settings are similar in other versions of Microsoft mail including Outlook.
To Set Up Your E-mail Account in Windows 7 Live Mail
In Windows Mail, from the E-mail Accounts menu, select Properties - you will need to be on the correct email account to do this.
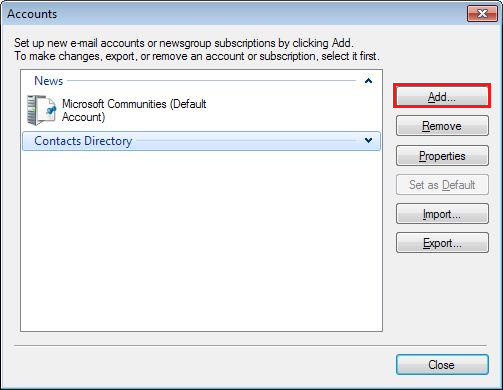
- Firstly you will need to open your account on the mail menu under TOOLS then select ACCOUNTS

- On the E-mail Accounts wizard window, select Add a new e-mail account, and then click Next.

- Select EMAIL ACCOUNT then NEXT

- Here you can enter your NAME, EMAIL ADDRESS & DISPLAY NAME
- Select "Manually Configure Server..." then Next

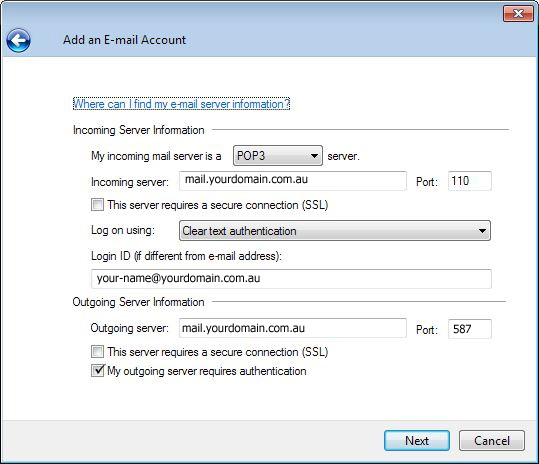
- Enter the following details as follows:
For your server type, select POP3 or IMAP, and then click Next. - Incoming mail server
mail.yourdomain.com.au PORT: 110 or 143 for SSL - Log on using: CLEAR TEXT AUTHENTICATION
- Login ID:
yourname@yourdomain.com.au - Outgoing mail server
mail.yourdomain.com.au PORT: 587 or 465 for SSL - This server requires a secure connection (SSL) OPTIONAL
- My Outgoing Server requires authentication - USE SAME SETTINGS AS INCOMING SERVER

Click Next and then Click Finish.
NOTE: This information has been provided as a courtesy about how to use certain third-party products, but we do not endorse or directly support third-party products and we are not responsible for the functions or reliability of such products. Windows Mail & Outlook 2003® 2007 & 2010 are registered trademark of Microsoft Corporation in the United States and/or other countries. All rights reserved.


